Showing posts with label girls. Show all posts

Thursday, February 27, 2014

A 'Retro Kinda' Girls Bowling Birthday Party

Big sis just turned 5- WOW how time flies!!!  She requested a bowling birthday party which was GREAT since her party is in February and we froze our behinds off last year trying to do a Superhero Obstacle course outside.  Here are a few shots from the shin-dig :)

Colors: teal and a soft pinkish red
Cupcakes: Strawberry with double choclate chunck brownie mix on the bottom half, topped off with a teal cream cheese frosting= YUM!
Favors: Cute little Ice Cream Sundae bubbles from Dollar Tree
Invitations and Party Decor: Christy's Customs (yours truly!)

Thanks for stopping in to take a peak!


Thursday, April 4, 2013

A {Girl Kinda} Superhero Birthday Party

Big sis just turned four... and big sis just happens to be a tough little cookie!  SO it wasn't that much of a surprise when she requested a superhero party... an orange superhero party, lol!  But her wish was my command, of course :)  Here are some shots from the fun little fiesta!

The Invites!
I found these fun (and free!) Superhero-ish fonts that made creating all our Superhero prints a breeze:
and you can find many more at this very cool Superhero Font site called Blambot Comic Fonts!  Check them out- they are amazing!!!

The Grub!
We decided on a simple menu: Superdogs and Veggies with Ranch... 
because Superheros Eat their Veggies!!!  The superdogs were easy to prepare too- we had two crockpots- one with the dogs and one with chili (because the adults need to eat too!) and a topping tray that I prepared the night before: onions, pickles, sauerkraut, cheese, tomatoes, and jalapeno and yellow peppers.

You can find the printables above by clicking the links below!
Superheros Eat Their Veggies and Superdogs Are Served- 8 1/2 X 11 Printable
Sound Effect Bubbles- 4 X 6 Index Card Printable
The Banner was made from Scrapbooking paper of the colors above, then I glued on the following letters to create the: Happy Fantastic Four and simply hung on string- super easy banner!!
Fantastic Four Banner Pt. 1- 8 1/2 X 11 Printable
Fantastic Four Banner Pt. 2- 8 1/2 X 11 Printable

The Capes!
Of course superheros need capes, right?!  You can find the tutorial with free templates HERE!

The Activities!
We did a "Superhero Training Course" with a "Villain" pinata at the end.  We had tied up baby dolls (poor things!) that our little superheros had to rescue by completing the different obstacles... but it just so happened to be FREEZING that day (of course!) so we cut the training course short and skipped to beating up on the poor villain... which my husband picked out-on his own-and happened to really be a Mexican Wrestler- close enough I suppose?!
Fun stuff, right??  They seemed to all have a blast despite the frigid conditions :)  Anyone else out there have little girls requesting superhero parties??


Wednesday, December 5, 2012

Santa Gift Tags... for those Special Gifts from the North Pole

I am just having too much fun creating Christmas printables... the latest???  Special tags from Santa himself!  Just take a look... they come directly from the North Pole!  And of course, they are only for good boys and girls!


These are 4X6 prints designed to be printed directly onto 4X6 postcards.  Click on the "boy" or "girl" tag above to download for free!  Enjoy :)


A Bowl Full of Lemons

Monday, November 19, 2012

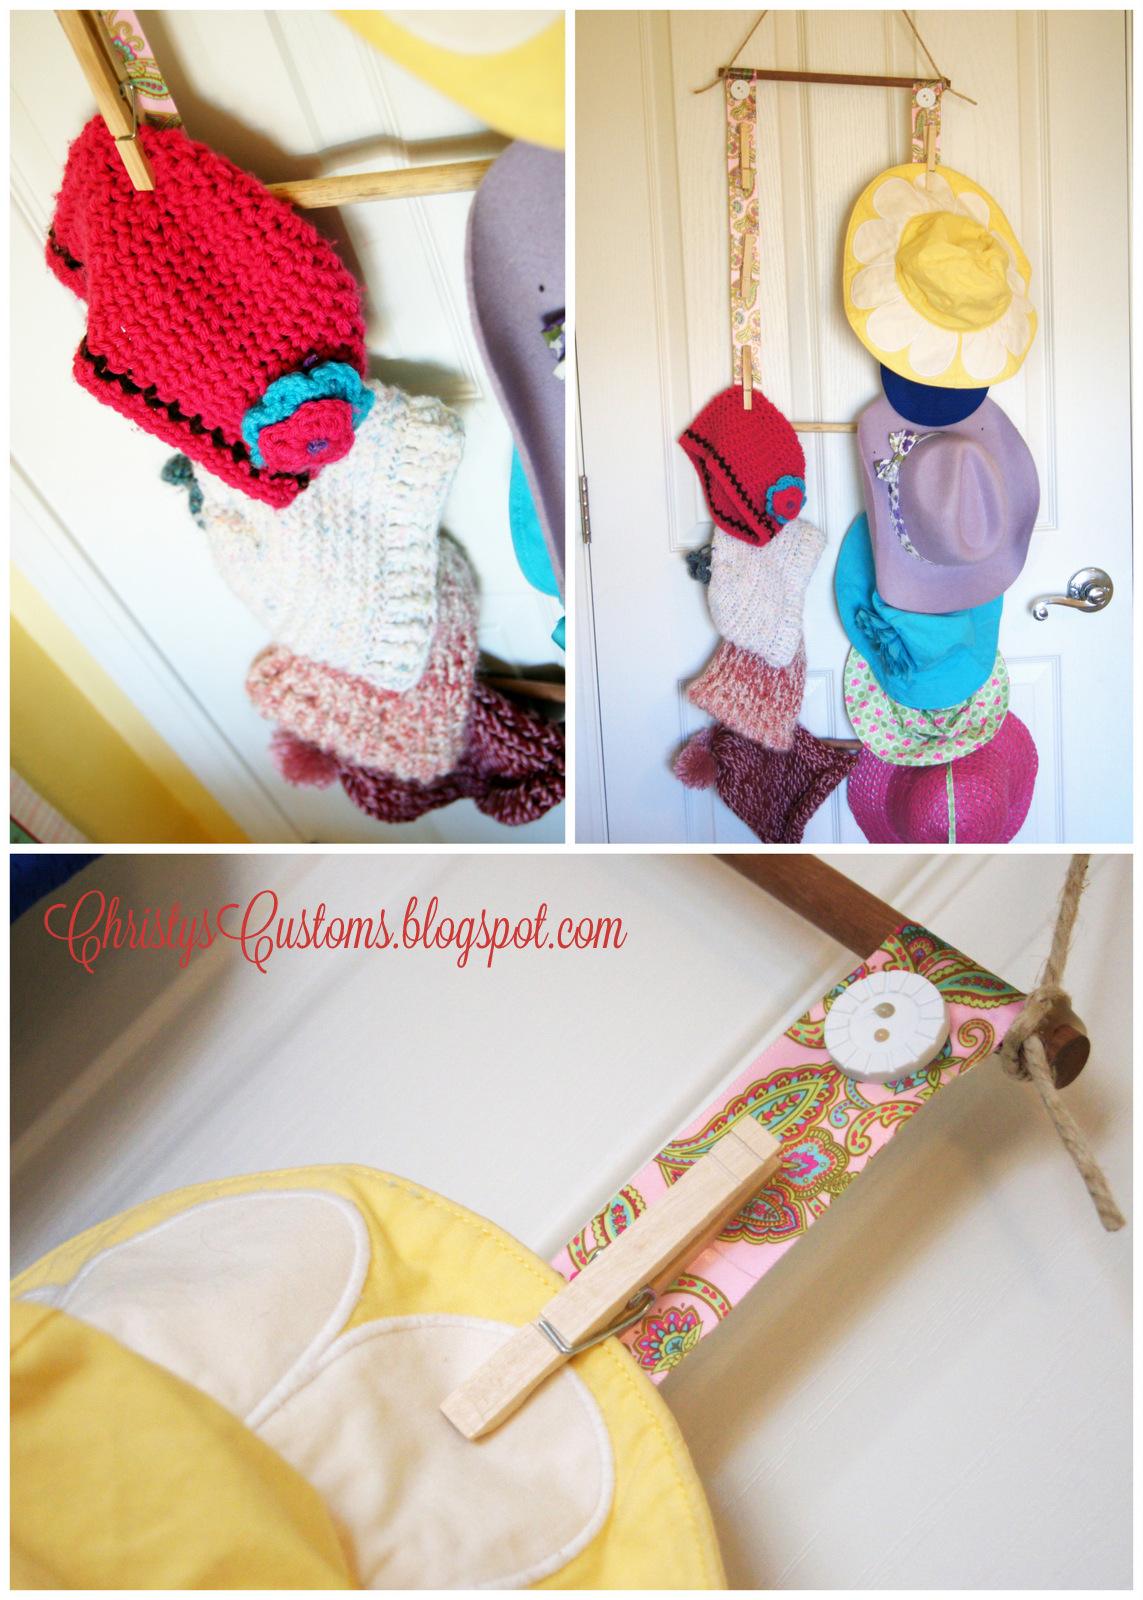
An Easy DIY Hat Holder


 We just completed a quick and much needed morning project.  When I say quick, I mean less than 30 minutes start to finish including the time it took for the hot glue gun to warm up.  What did we make??  A hat holder!!  And when I say we, I mean me and my two trusty side kicks, big sis and baby sis.  (As you can see, baby sis played a crucial role!)

The Problem:  Too many hats, not enough hooks!!


The Materials:

3- 12" wooden dowels (less than $2 for a bag of 5)
2 to 3 yards of thick ribbon
4 decorative buttons
1 1/2 to 2 feet of rope (I used some thick hemp I already had)
12 wooden clothespins
Hot Glue Gun

How To:

Cut your ribbon so you have two equal lengths.  Just over a yard each is what I had.  Lay out the ribbons good side down, and place one dowel at the top, one in the middle, and one at the bottom.  Glue the ribbon onto the dowel at the top and bottom, wrapping the ribbon around each dowel.  Glue the center dowel on with just one line of glue on the ribbon.
Next, turn it over so the good side is up.  Lay out your clothespins so they are equally spaced, 6 on one side, 6 on the other (each of mine were 2 1/2" apart).  Glue each wooden clothespin down.
Next glue on your decorative buttons at the top and bottom and tie your rope to both side of the top dowel.  Use a dab of hot glue to keep the rope knots in place.  And, ta-dah!  You are finished, that quick and easy!
To hang the hats, simply clip on with the clothespins.  Pretty much any type of hat works this way; beanies, sun hats, cowboy hats, and even baseball caps.
Gone are the days of searching for just one beanie to keep those little ears warm- they are right there on the back of the girls' door!  

Are you as over-run with hats as we are!?  Who knew girls could accumulate so many hats!!!  I am so happy to have this little project done!


Thursday, October 4, 2012

The Girls' Focal Wall

So my sweet baby girl is now 4 months old and I am finally getting around to finishing her and big sissy's room.  When big sis was born, the room was custom designed just for her... but when sweet little sis came along, we made the big decision to have the girls share... which was great; less work for me to do to prepare for baby #2, but at the same time very sad, well, because there was less work that I got to do!  So... with a few furniture changes (big sis got a new bed!), I was left with a wall to decorate- woo hoo!

Of course, I started this whole process when I was 8 months pregnant... why not, right!?

I, the always frugal and thinking how can I make do with what I have, scrounged through a box of old frames and begged one very willing father in law for some ugly old black mirrors that once hung in my hubby's garage.  I came up with a general layout and knew I wanted to add in some sisterly quotes and other fun projects I have seen on Pinterest as well.  Yes... that belly was crawling around on our living room floor to do this!
After prepping all the frames, I begged the hubby to please, please, please spray paint this stack white, this stack blue, and this stack pink, and he obliged because that's just the kind of awesomeness he is.... and we turned that into this!

And the longer I thought about this wall piece, the more things I realized we already had that would work perfectly... like the random canvas picture of our first daughter, some clay handprints, and some other random frames gathered from around the house.  One of the mirrors I decided to leave a mirror while the second frames I used to create a much needed bow holder.

And then everything just sat.... baby girl came and everything just sat!  The world just seems to spin on without you when you have a newborn.  But now, four moths later, tadah!  The focal wall is up.


Pin It button on image hover